dejaOS IDE
Overview
dejaOS IDE is a VSCode-based plugin (extension) for developing, debugging, and deploying dejaOS applications. After installing the plugin, you need to open a project directory that contains an app.dxproj file in the root directory for the plugin functionality to be properly enabled.
app.dxprojis the project description file for dejaOS applications, defining configuration information such as module dependencies and device models.
If you prefer terminal workflows, automation scripts, or AI-assisted programming, you can use the standalone DejaOS CLI. The CLI does not require the VSCode extension and provides component installation, building, synchronization, application control, and log streaming.
The IDE also includes a visual, what-you-see-is-what-you-get editor for .ui files. You can compose dxUi control trees by dragging controls on a device-sized canvas, then load the generated JSON interface with uiLoader. See Visual UI Editor for the complete workflow.
On Windows x64, the IDE can also download and launch the DejaOS Simulator on demand. It runs the project's JavaScript with QuickJS and renders dxUi through native LVGL, so you can preview and interact with the UI before connecting a device. See Windows UI Simulator for setup, supported behavior, and limitations.
Disconnected Device State
When no device is connected, you can still write and manage code. On Windows x64, you can also run the project's UI in the simulator. Device deployment, hardware integration, and final validation still require a physical device.
Interface illustration:
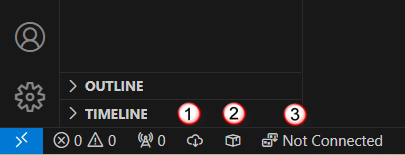
The bottom-left corner provides these basic operation buttons:
-
Install
Similar tonpm install, downloads required modules based on dependency information in theapp.dxprojfile. -
Package
Builds application packages (.dpkfiles). Since dejaOS uses JavaScript, no compilation is needed - it only packages and compresses code and resources. -
Connect
After connecting the device to the computer via USB, click this button to establish a communication connection. Connection status is reported through a popup in the bottom-right corner indicating success or failure. -
Simulator Runs the current project in the native Windows simulator. The first run asks for permission to download and install the matching simulator runtime. Runtime output is shown in the DejaOS Simulator output channel.
Connected Device State
After successful connection, more operation buttons will appear in the bottom-left corner:
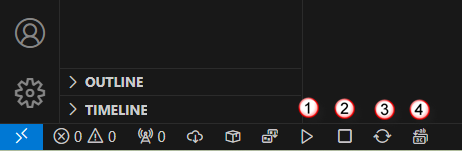
Additional buttons include:
- Start: Launch the application on the device
- Stop: Stop the currently running application
- Sync: Sync changed code files to the device
- SyncAll: Full sync of all code to the device
It's recommended to use
SyncAllfor complete project synchronization before running the application for the first time. This operation may take a while and supports viewing sync progress.
For subsequent operations, you only need to useSyncto quickly sync changed parts.
Viewing Logs
You can view running logs in real-time in the OUTPUT panel at the bottom of VSCode:

Quick Operations
Improve development efficiency through VSCode's command palette or keyboard shortcuts:
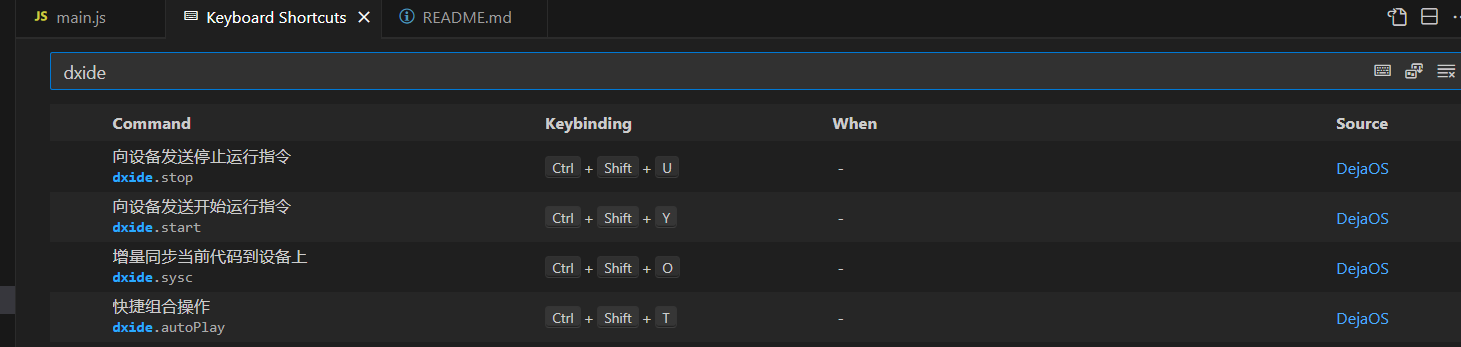
Recommended keyboard shortcuts:
- Ctrl + Shift + T: Quickly execute the sequential operation of sync code → stop application → start application.
Summary
dejaOS IDE provides one-stop support for embedded application development, integrating visual UI editing, native UI simulation, module management, packaging and deployment, device connection, and debugging. It is the recommended tool for efficient dejaOS application development.