Device
This document describes a minimal runnable implementation of video intercom on DejaOS devices and platform services.
It covers module responsibilities, key parameters, thread model, call flow, H5 test procedure, and current multi-client constraints.
1. Scope
This example is intended to validate:
- A baseline device architecture (UI main thread + intercom worker thread).
- The minimal call path (initialize -> network up -> incoming call -> answer/hangup).
- Integration with platform-side WebRTC services.
2. Device Module Responsibilities
Core modules used in the sample:
dxCapture: captures frame-by-frame images from the camera.dxIvcore: processes raw image data.dxAudio: handles audio capture and playback.dxDisplay: renders image frames to the device screen.dxIntercom: handles intercom media flow (video one-way, audio two-way at present).dxNetwork: handles network access and status callbacks.
Video intercom requires stable connectivity:
eth(wired) usually gives better latency and stability.wifiworks, but may show higher jitter in noisy wireless environments.
3. Thread Model
The sample uses a two-thread design:
main.js(main thread): UI rendering and user interactions.intercomWorker.js(worker thread): network/media/intercom initialization and callbacks.
This separation prevents media/network processing from blocking UI responsiveness.
4. Main Thread: Key Calls
The main thread triggers worker initialization over the event bus:
const WEBRTC_SERNO = "KDZN-00-1K4V-HBNJ-00000004";
const WEBRTC_URL = "webrtc.dxiot.com:6699";

bus.fire("worker.connect", {
  webrtcSerno: WEBRTC_SERNO,
  webrtcUrl: WEBRTC_URL,
});
Parameter notes:
webrtcSerno: unique platform-side device identifier (call target ID). Each device should map to exactly oneserno.webrtcUrl: intercom service endpoint (sample format:host:port). Server-side deployment/configuration is documented separately. In the current default deployment, signaling and WebRTC services are installed together, so one URL is typically used.
The main thread also owns worker lifecycle and state sync:
bus.newWorker("intercomWorker", "/app/code/src/intercomWorker.js");
bus.on("ui.log", (payload) => { /* log output */ });
bus.on("ui.session", (payload) => { /* sessionId sync */ });
/app/code/src/intercomWorker.js must exist in the packaged device filesystem with the same path.
5. Worker Initialization Flow
Recommended initialization order in the worker:
dxNet.init();
dxIvcore.init();
dxCapture.init();
dxAudio.init();
dxDisplay.init();

dxIntercom.init({
  webrtc: {
    serno: webrtcSerno,
    servers: webrtcUrl,
  },
});
Then register callbacks and bring up network:
dxIntercom.setCallbacks({
  onIncoming(sessionId, action) { /* incoming start/end */ },
  onCallStart(sessionId) { /* call started */ },
  onCallEnd(sessionId) { /* call ended */ },
  onCallFail(sessionId, reason) { /* call failed */ },
});

dxNet.connectEthWithDHCP();
Business logic (state machine, door control, telemetry/reporting) should be attached at callback layer.
6. Event Loop and Session Control
The sample drives network and intercom loops every 30 ms:
std.setInterval(() => {
  dxNet.loop();
  dxIntercom.loop();
}, 30);
sessionId is the unique call key used for answer/hangup:
dxIntercom.answer(sessionId);
dxIntercom.hangup(sessionId);
Auto-answer, timeout hangup, and busy-reject policies are typically implemented via a sessionId-based state machine.
7. Multi-Client Interop Status
Currently supported WebRTC clients:
- DejaOS device
- Android client
- H5 client
Current limitation:
- A DejaOS device cannot directly initiate a call to Android or H5.
Typical production flow:
- DejaOS device notifies backend service (for example via HTTP).
- Backend service notifies Android client.
- Android client calls back to the DejaOS device.
This sample uses H5 -> DejaOS calling for quick integration testing.
8. H5 Test URLs
Test site:
https://webrtc.dxiot.com:8443/
Sample call URL:
https://webrtc.dxiot.com:8443/videocall/KDZN-00-1K4V-HBNJ-00000004
Replace the last segment with your target device serno.
This public address is for debugging only and should not be used directly in production.
9. H5 Sample (Brief)
H5 sample directory: demos/vf105_v12/vf105_v12_intercom/h5
index.html entry call:
var toclientid = "KDZN-00-1K4V-HBNJ-00000004";
var host = "webrtc.dxiot.com:8443";
RHRTCStart(host, toclientid, remoteVideoview, "live", "MainStream", true, true);
rhrtc.js primarily:
- Builds WebSocket signaling (
__connectto,__call,__answer,__ice_candidate). - Runs standard WebRTC negotiation (Offer/Answer/ICE).
- Binds remote media to
<video>and handles basic reconnect logic. - Communicates over a private WebSocket protocol with a private signaling service.
WebSocket protocol details are documented in the Android-related documentation.
10. Debug Steps and Expected Behavior (Device + H5)
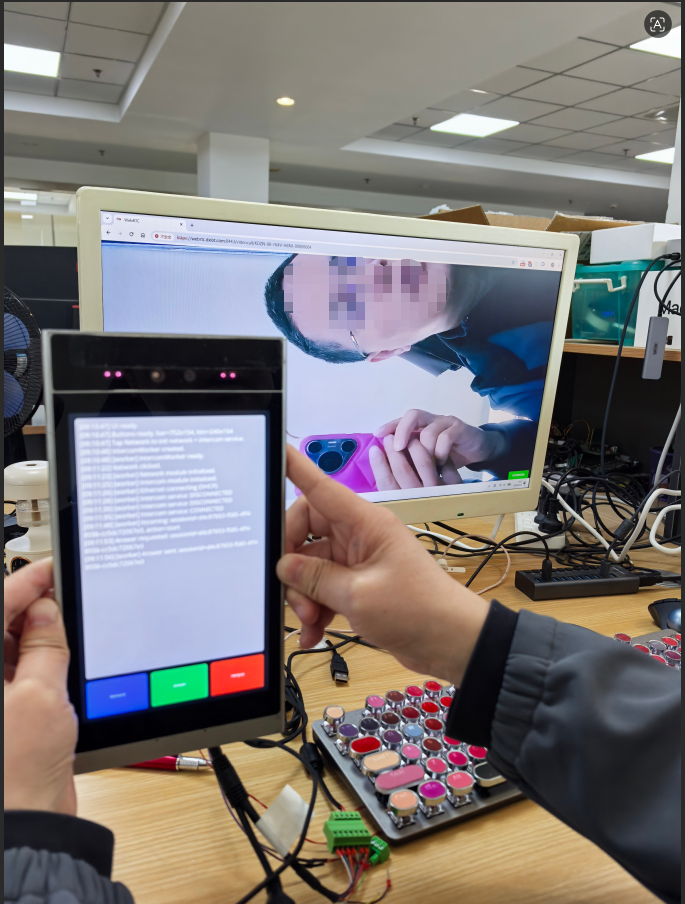
Recommended validation sequence:
-
Click
Networkon the device UI.
The main thread sendsworker.connect; the worker initializesdxNetwork,dxIvcore,dxCapture,dxAudio,dxDisplay, anddxIntercomin order.
dxCapture/dxAudio/dxDisplayare typically initialized with defaults.dxIntercommust receive at leastsernoandservers. -
After
dxIntercom.init, the device connects to signaling and completes registration. -
Open:
https://webrtc.dxiot.com:8443/videocall/KDZN-00-1K4V-HBNJ-00000004
Internally, H5 connects to signaling over WebSocket, then follows standard WebRTC flow to establish a session with the device. -
When
Incomingappears on device logs, clickAnswer.
The worker callsdxIntercom.answer(sessionId)and enables media (setAudio/setVideo).
H5 should now display the device camera feed, and two-way audio should work. Keep distance during testing to reduce acoustic echo. -
Click
Hangup.
The worker callsdxIntercom.hangup(sessionId), ending the session and stopping active media flow.
11. Source Links
Device sample source:
H5 sample source:
Device
Content for the device part of video intercom (hardware roles, peripherals, and on-device responsibilities) will be added here.