Hello World Quick Start
Create a New Project
- Launch VSCode and click the
DejaOSicon in the sidebar - Select
Create Project, enter a project name, and choose a storage path - Click
Submitto create the project
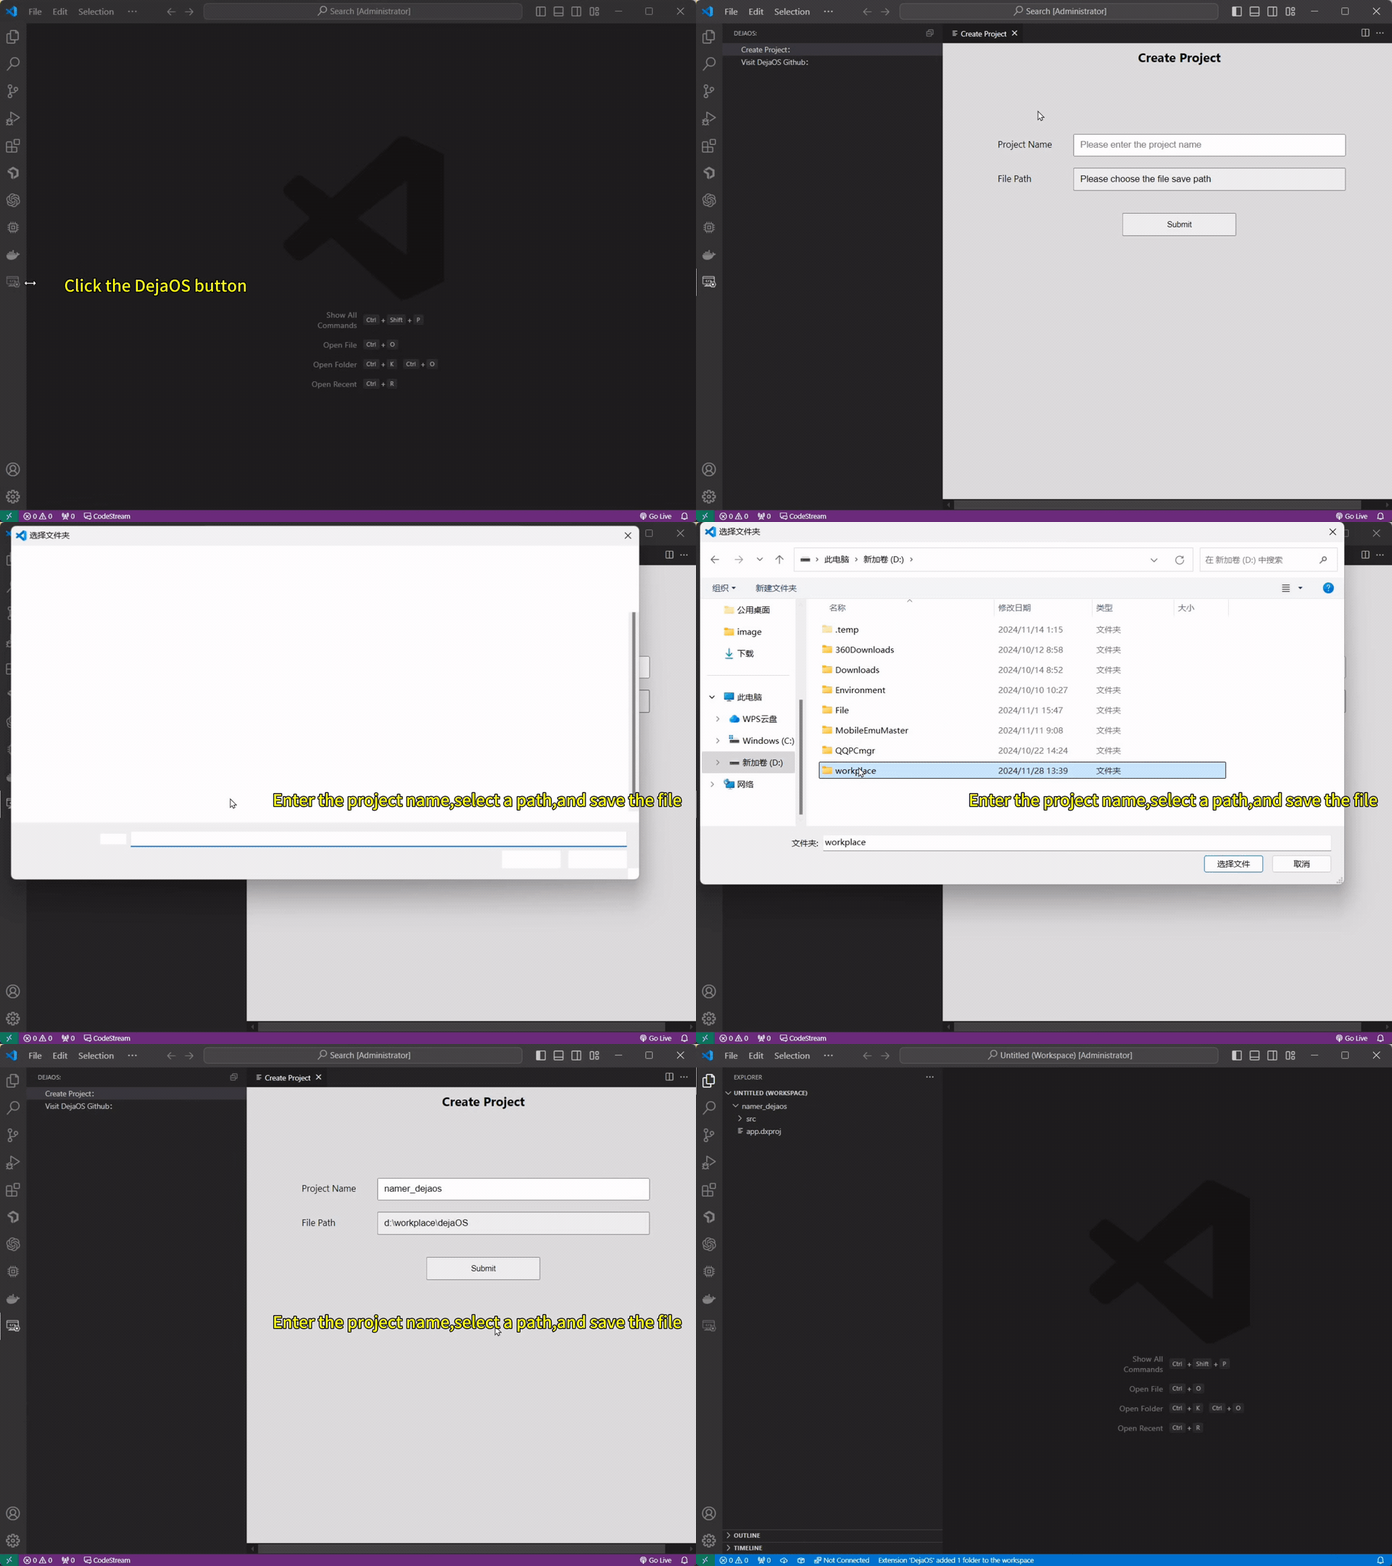
- In your project directory, click the
app.dxprojfile to open the visual configuration interface - After editing the configuration, click
Add Moduleto add required modules and save
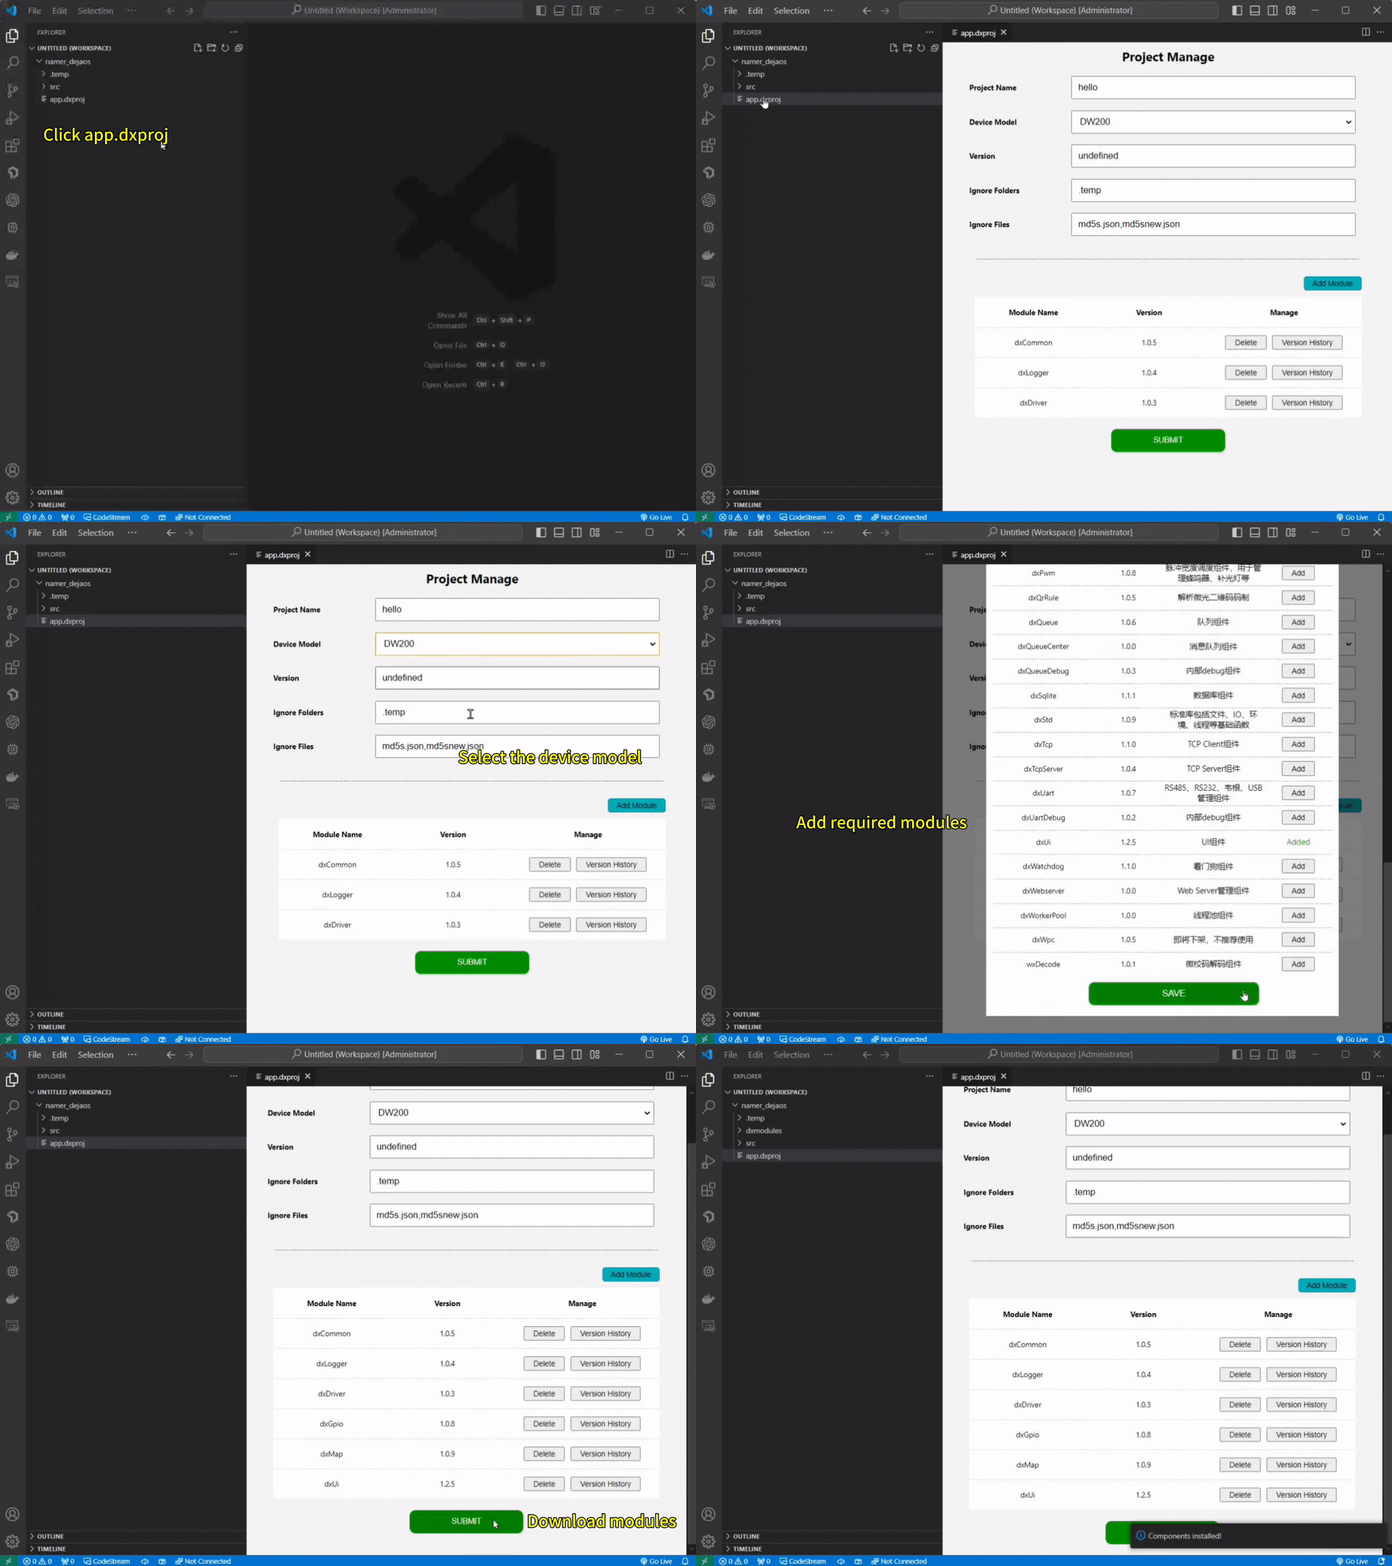
⚠️ Note:
- Ensure the selected device model matches your actual hardware
- If you change the device model, reconfigure all module versions
- Module versions are not compatible across different device models
Import an Existing Project
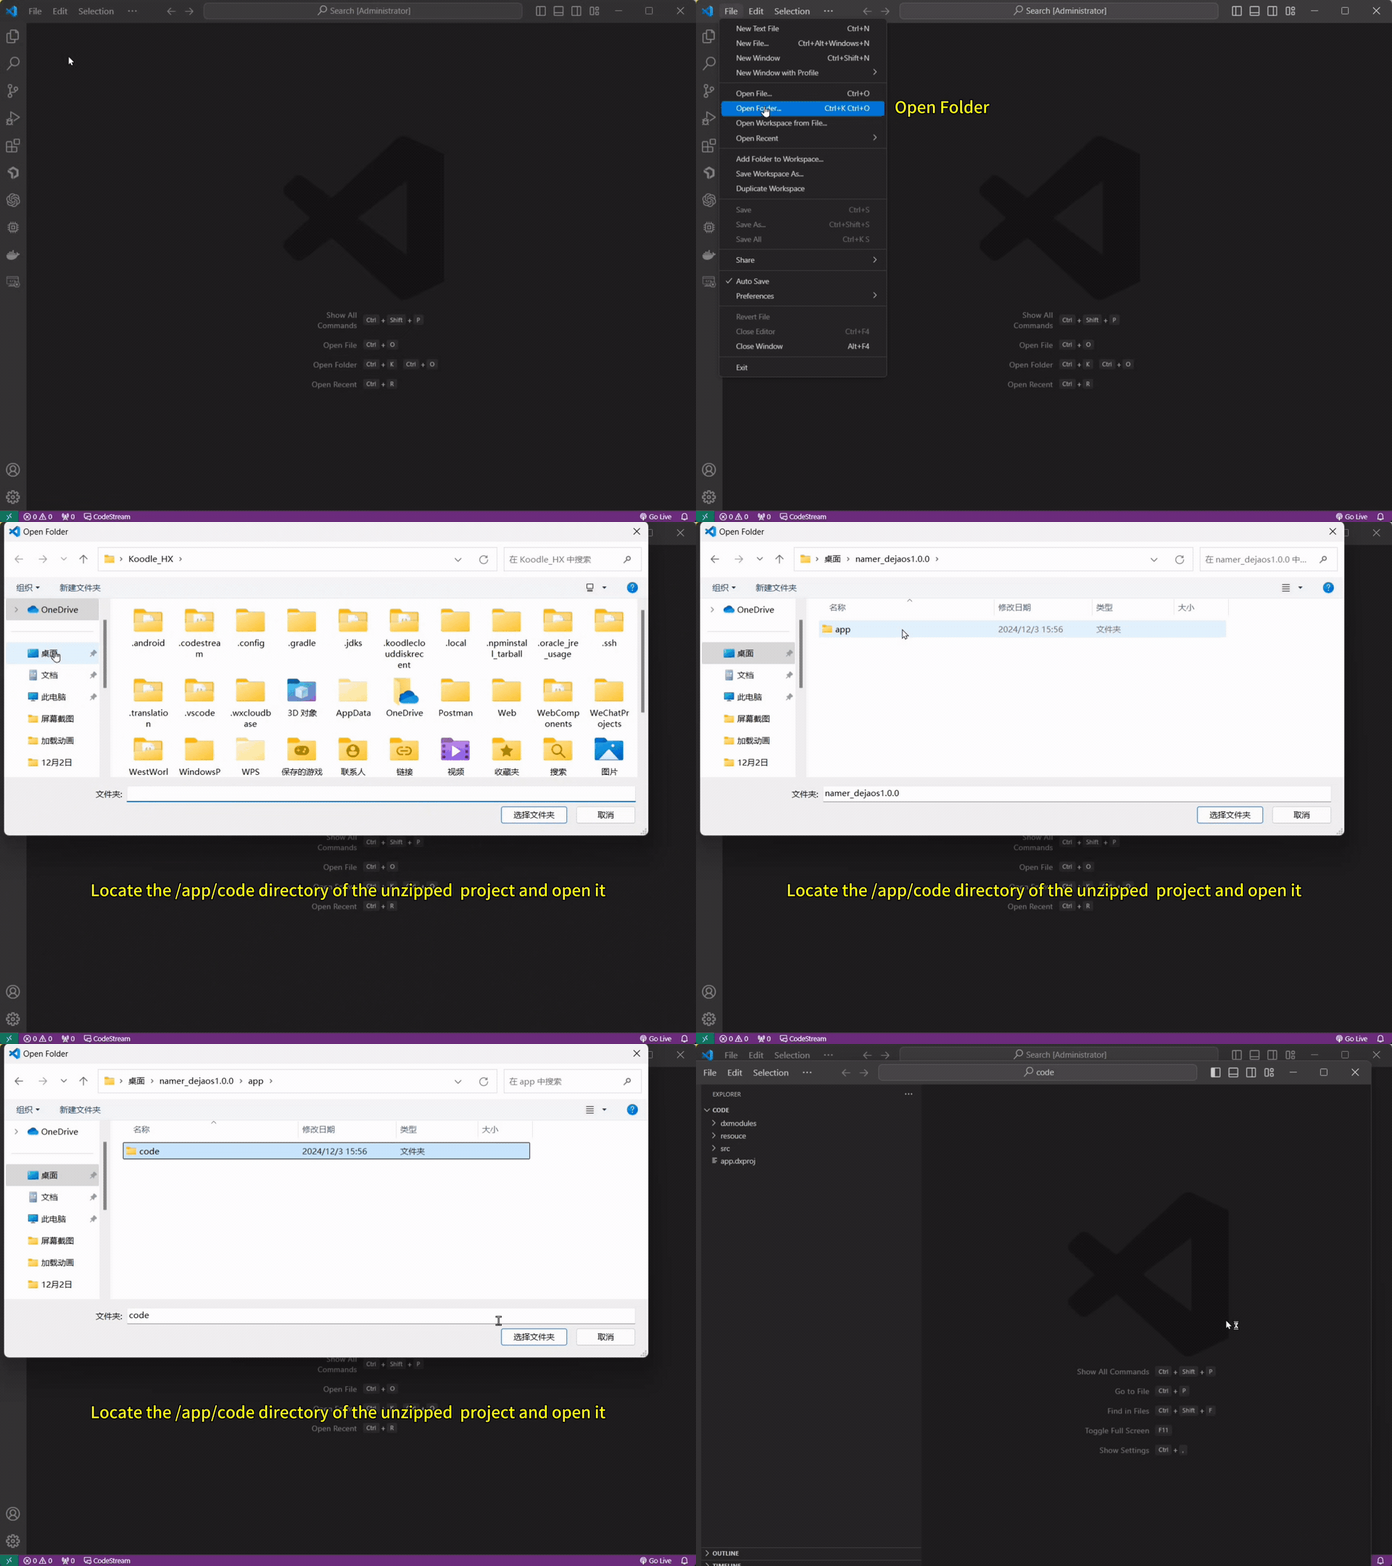
DejaOS offers a variety of GitHub examples. You can download any example and import it into VSCode:
- After downloading, open the code directory in VSCode
- Make sure the directory contains an
app.dxprojfile at the root—this is required to activate the extension
Connect Device & Sync Code
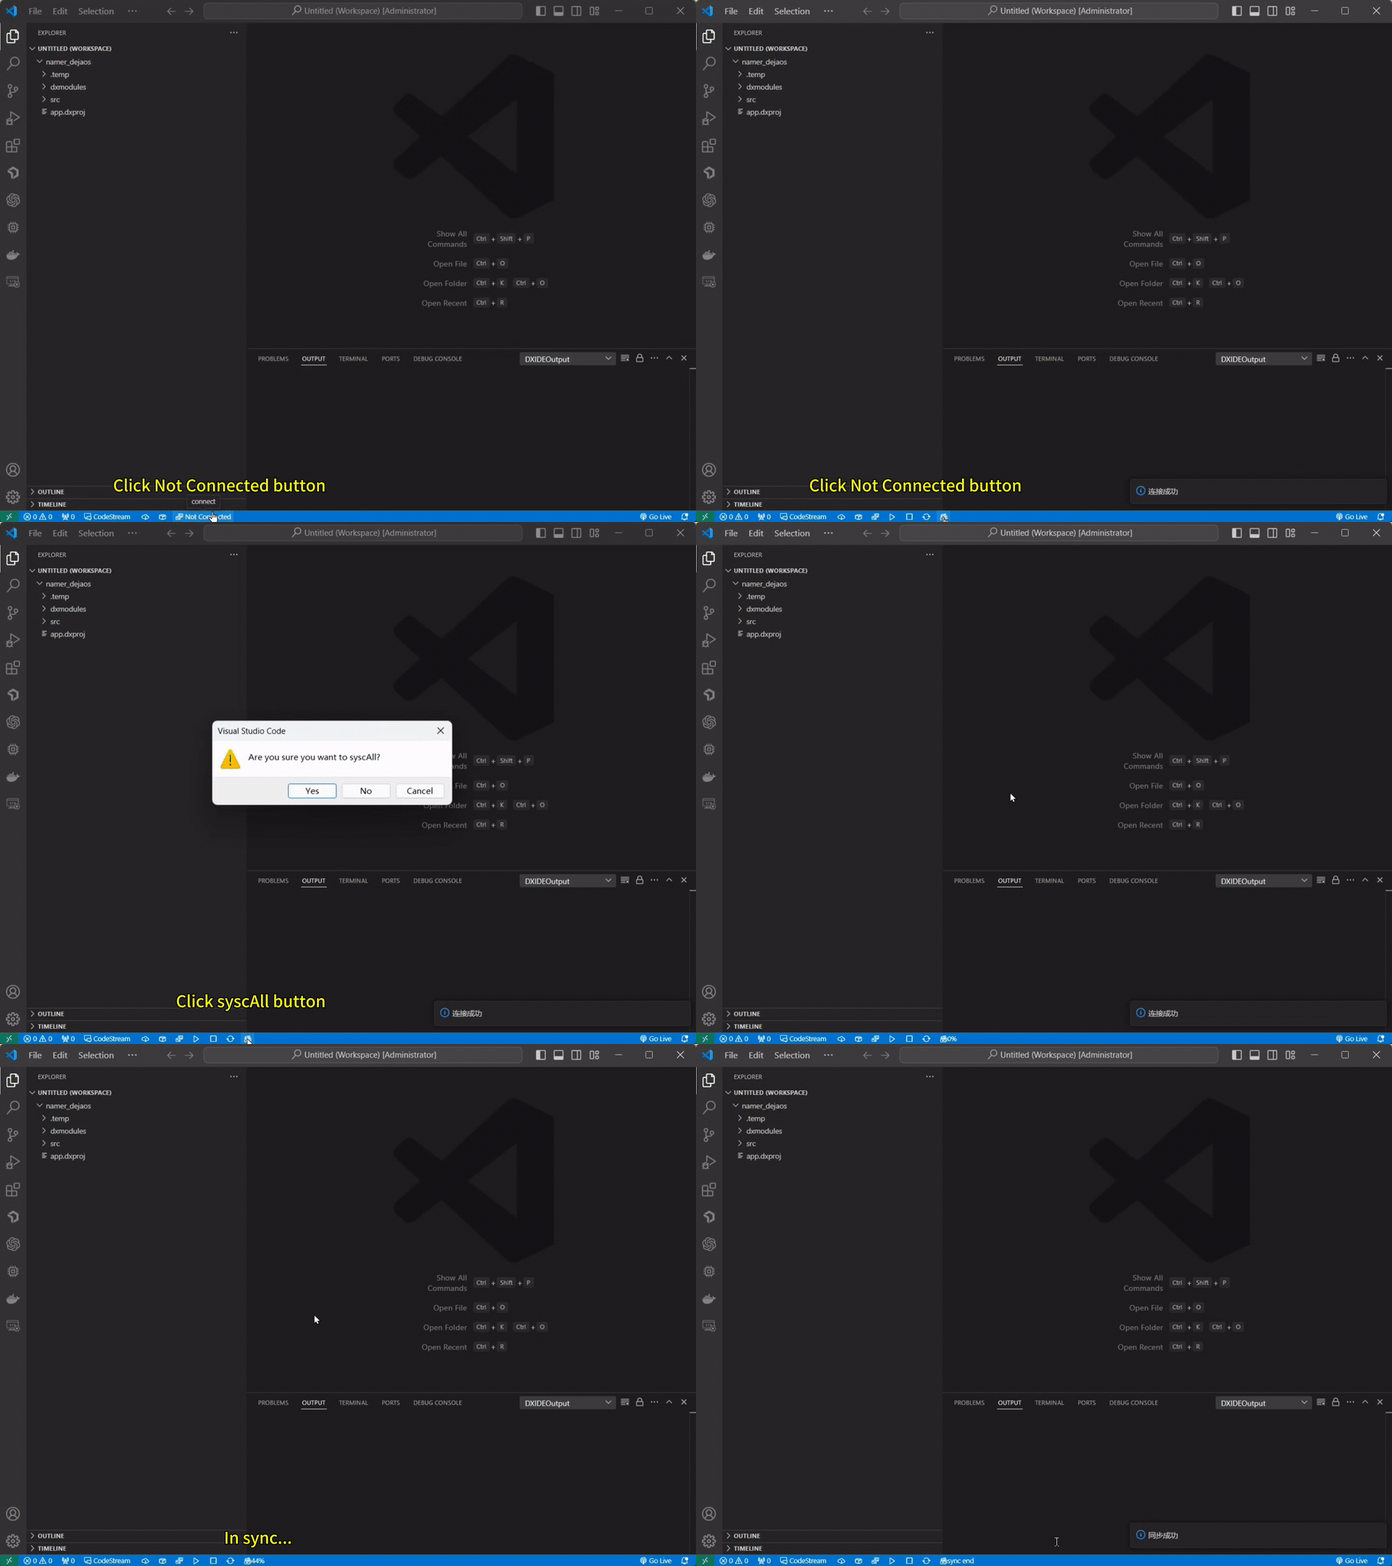
- Click the
Not Connectedbutton at the bottom of VSCode and select your device - Click the
installbutton at the bottom of VSCode to download the dependent libraries - Once connected, click
syncAllfor the initial full sync (this may take a while)
⚠️ Note:
- Please select an example that matches your connected device model. If they don't match, you can manually modify the device model in app.dxproj and reselect modules versions
- The first sync must use
syncAll. For subsequent development, usesyncfor faster incremental updates.
Using the Command Line
If you prefer terminal workflows, automation scripts, or AI-assisted programming, install DejaOS CLI:
npm install -g dejaos-cli
Run the following commands from the project root:
dejaos install
dejaos sync --all
dejaos start
After subsequent code changes, run dejaos run to automatically stop the application, perform an incremental sync, and restart it.
Coding Example: Controls Relay
Add the following code to your project's main.js to control a relay with a button press:
import logger from "../dxmodules/dxLogger.js";
import dxui from "../dxmodules/dxUi.js";
import std from "../dxmodules/dxStd.js";
import gpio from "../dxmodules/dxGpio.js";
import * as os from "os";

// ui context
let context = {};

function initScreen() {
  // ui init
  dxui.init({ orientation: 1 }, context);
  // Create screen
  let mainView = dxui.View.build("mainView", dxui.Utils.LAYER.MAIN);
  // Create a button control
  let button = dxui.Button.build(mainView.id + "button", mainView);
  // Set button size
  button.setSize(130, 50);
  // Create a label control
  let label = dxui.Label.build(mainView.id + "label", button);
  // Set text content
  label.text("Click");
  // Set text color
  label.textColor(0x000000);
  // Set the position of the text in the button
  label.align(dxui.Utils.ALIGN.CENTER, 0, 0);
  // Listen for button click event
  button.on(dxui.Utils.EVENT.CLICK, handleGpio);
  // Load screen
  dxui.loadMain(mainView);
}

(function () {
  initScreen();
})();

function handleGpio() {
  const gpio_id_dw200 = 44;
  // Init gpio
  let res = gpio.init();
  logger.info("init gpio", res);
  // Request gpio
  res = gpio.request(gpio_id_dw200);
  logger.info("request gpio", res);
  // Output high level to open the relay
  res = gpio.setValue(gpio_id_dw200, 1);
  logger.info("Output high level", res);
  // Get whether the current level is high or low
  res = gpio.getValue(gpio_id_dw200);
  logger.info("The level is now", res);
  // Wait 3 seconds
  os.sleep(3000);
  // Output low level to close the relay
  res = gpio.setValue(gpio_id_dw200, 0);
  logger.info("Output low level", res);
  res = gpio.getValue(gpio_id_dw200);
  logger.info("The level is now", res);
}

std.setInterval(() => {
  dxui.handler();
}, 5);
Run the Project
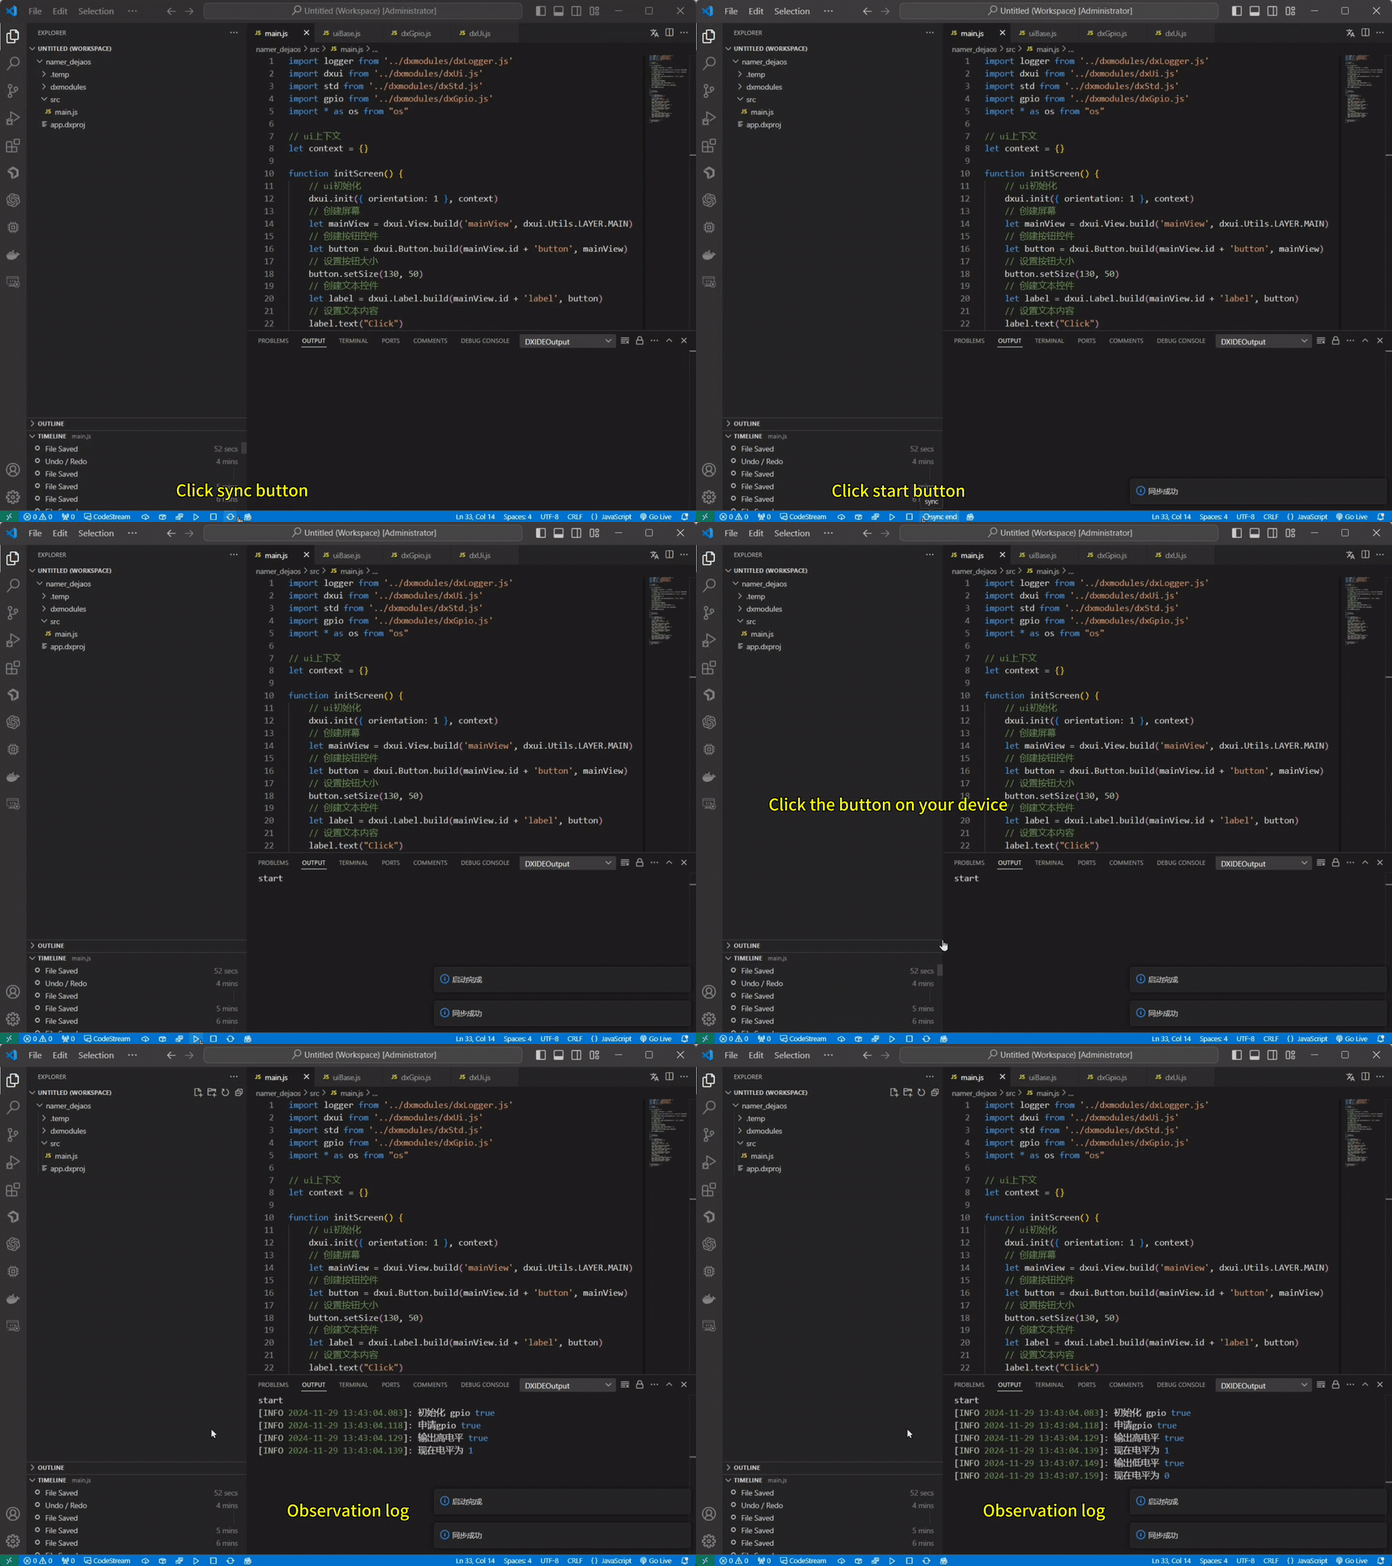
- After coding, click the
syncbutton to upload changes to your device - Once synced, click
startto launch the application - View log output in the VSCode console and observe the device screen
When using the command line, run dejaos run to synchronize and start the project, and run dejaos logs to continuously view real-time device logs.
Package the Project
When development is complete, you can package your project as a .dpk installer for deployment:
- Click the
packagebutton to start packaging
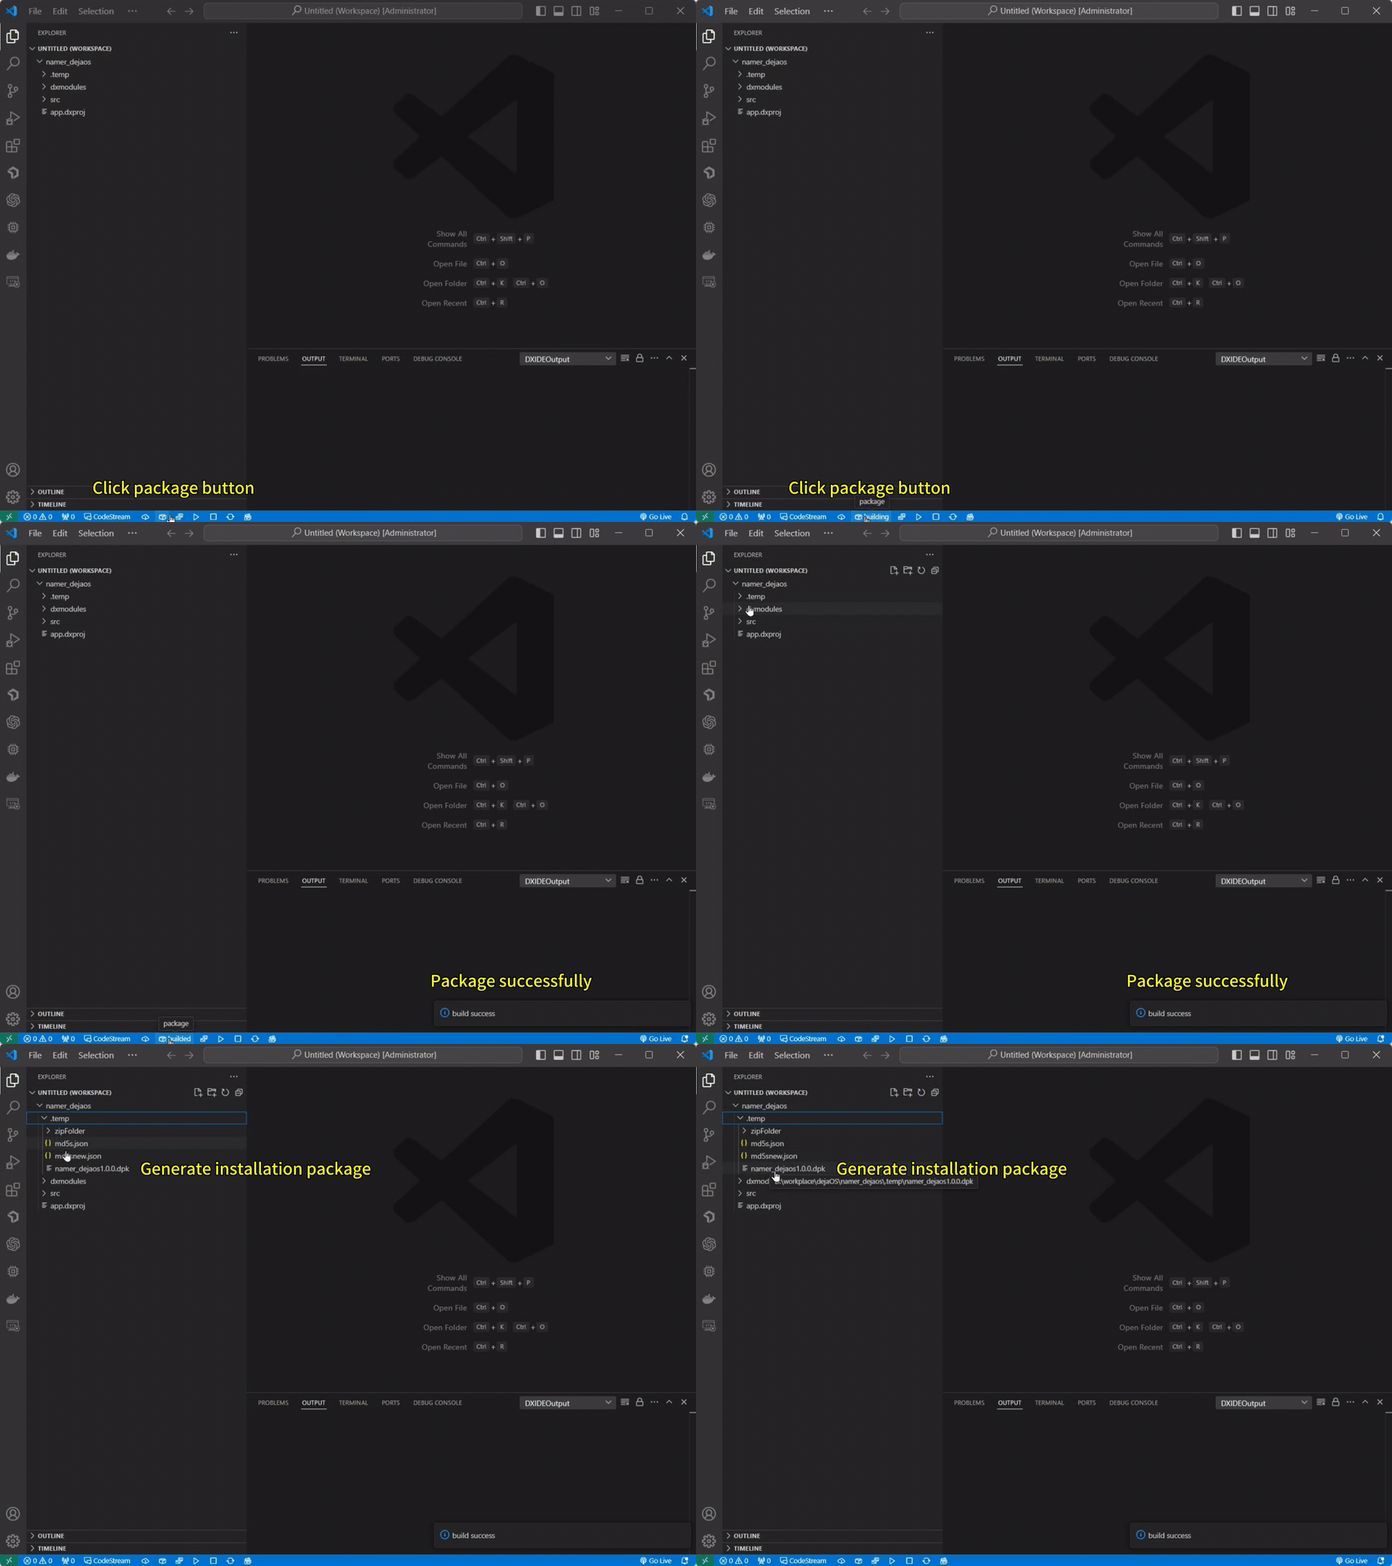
- The installer will be saved in the
.temp/folder within your project directory
.dpkfiles are DejaOS-specific installers, suitable for OTA or serial deployment
Next Steps
- 📦 To install or upgrade your
.dpkapplication on a device, see: App Packaging, Installation, and Upgrade - 🧪 For more JavaScript App projects, see: Example Projects