Example: Face Detection and Tracking Box
Introduction
This chapter will use a complete example to explain in detail how to implement the most basic face detection feature: dynamically drawing a rectangular box that tracks a face on a live camera feed. This is the starting point for all facial recognition applications.
We will use a dual-thread (Worker) model to build this application, separating face processing from UI rendering. This is a best practice to ensure the smooth operation of complex applications. The basic flow is as follows:
- Main Thread (
main.js): Starts two worker threads: one for face processing and one for the UI. - Face Thread (
faceworker.js): Independently responsible for initializing thedxFacialcomponent and driving its internal loop. - UI Thread (
uiworker.js): Responsible for UI initialization, periodically fetching face position data fromdxFacial, and then drawing the tracking box.
Code Implementation
main.js: The Entry Point
import log from "../dxmodules/dxLogger.js";
import bus from "../dxmodules/dxEventBus.js";

function init() {
  bus.newWorker("screen", "/app/code/src/worker/uiworker.js");
  bus.newWorker("face", "/app/code/src/worker/faceworker.js");
}
try {
  init();
} catch (error) {
  log.error(error);
}
Code Analysis
The logic in the entry file main.js is very simple. It does only one thing: creates and starts two independent Worker threads for handling the UI (uiworker.js) and facial recognition (faceworker.js). This separation prevents time-consuming facial algorithms from blocking UI updates, ensuring a smooth interface.
faceworker.js: Face Engine Processing Thread
import face from "../../dxmodules/dxFacial.js";
import log from "../../dxmodules/dxLogger.js";
import std from "../../dxmodules/dxStd.js";
try {
  face.init();
} catch (error) {
  log.error(error);
}
std.setInterval(() => {
  try {
    face.loop();
  } catch (error) {
    log.error(error);
  }
}, 20);
Code Analysis
The face processing thread (faceworker.js) has a very specific responsibility:
- Initialize the
dxFacialcomponent: Callsface.init()to start the facial recognition engine. - Periodically drive the engine: Uses
std.setIntervalto callface.loop()at regular intervals. This function is the "heartbeat" of thedxFacialcomponent. It drives the internal engine to process camera data, execute detection/recognition algorithms, and manage the event queue. Even though this example does not handle recognition events, this polling must exist, otherwise the engine will not work.
uiworker.js: UI Rendering and Interaction Thread
import log from "../../dxmodules/dxLogger.js";
import std from "../../dxmodules/dxStd.js";
import dxui from "../../dxmodules/dxUi.js";
import face from "../../dxmodules/dxFacial.js";

let faceview = null;
try {
  dxui.init({ orientation: 1 });
  let mainview = dxui.View.build("mainview", dxui.Utils.LAYER.MAIN);
  mainview.bgOpa(0); // background opacity
  mainview.scroll(false);

  faceview = dxui.View.build("faceview", mainview);
  faceview.bgOpa(0);
  faceview.radius(0);
  faceview.padAll(0);
  faceview.setSize(200, 200);
  faceview.borderWidth(5);
  faceview.setBorderColor(0xff0000);
  faceview.hide();

  dxui.loadMain(mainview);
} catch (error) {
  log.error(error);
}
function showFaceView() {
  // [{"id":4,"status":1,"rect":[8,224,360,668],"qualityScore":26,"livingScore":41}]
  let detectionData = face.getDetectionData();
  if (faceview && detectionData && detectionData.length > 0) {
    faceview.show();
    faceview.setPos(detectionData[0].rect[0], detectionData[0].rect[1]);
    faceview.setSize(
      detectionData[0].rect[2] - detectionData[0].rect[0],
      detectionData[0].rect[3] - detectionData[0].rect[1]
    );
  } else if (faceview) {
    faceview.hide();
  }
}
std.setInterval(() => {
  try {
    showFaceView();
    dxui.handler();
  } catch (error) {
    log.error(error);
  }
}, 15);
Core Logic Explained
1. Transparent UI and Camera Feed Overlay
This is the most critical point for implementing this feature. The live video stream from the camera is rendered on the bottom-most layer of the screen by default. To overlay UI elements (like the face box) on top of the video, our main UI container (mainview) must have a completely transparent background (mainview.bgOpa(0)). Otherwise, the UI will completely obscure the camera feed, making it impossible to see the face.
At the same time, the faceview used for drawing the face box is also set with a transparent background and a red border, making it appear as a hollow rectangle.
2. Real-time Fetching and Parsing of Face Data
The UI thread uses a high-frequency setInterval loop (15ms) to continuously refresh the interface. In each loop:
face.getDetectionData(): This function retrieves the latest face detection results from thedxFacialengine with high frequency and low overhead.- Parse Data: If the returned
detectionDataarray is not empty, it means a face has been detected. The program takes the data of the first face and updates the position and size offaceviewbased on itsrectcoordinates. - UI Update:
dxui.handler()is responsible for rendering the changes infaceview's position and size to the screen.
If detectionData is empty, faceview is hidden. This series of operations achieves the effect of the face box tracking the face's movement in real-time.
Data Structure Explained: getDetectionData
getDetectionData() returns an array, with each element representing a detected face object. Its structure is as follows:
[
  {
    "id": 4,
    "status": 1,
    "rect": [8, 224, 360, 668],
    "qualityScore": 26,
    "livingScore": 41
  }
]
id: A unique identifier for the face in the current frame. Used to distinguish between multiple faces. Note: If the same person leaves and re-enters the frame, theidmay change.rect: An array of four values[x1, y1, x2, y2], representing the top-left(x1, y1)and bottom-right(x2, y2)coordinates of the bounding box.qualityScore: The quality score of the face.livingScore: The liveness detection score (if enabled).
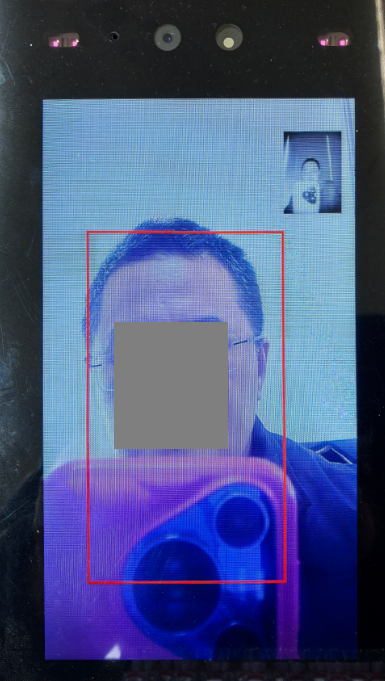
How It Looks
Summary
The example above provides a complete demonstration of how to use dxFacial and dxUi to implement a basic face detection and tracking application.
The key takeaways are:
- Thread Separation: Use Workers to separate time-consuming
dxFacialoperations fromdxUirendering to avoid mutual blocking. - Transparent UI Overlay: Set the UI background to transparent to draw custom content on top of the live camera feed.
- High/Low-Frequency Separation: Use the low-frequency
face.loop()to process engine events and the high-frequencyface.getDetectionData()to update the UI for efficient rendering.
This simple example forms the basis of all facial recognition applications. In subsequent chapters, we will build on this foundation to construct more complex face registration and recognition features. Src